Do it
yourself...and save!
Anyone with a basic understanding of construction can insulate
their own home. All it takes is a little time. Ask an
associate for everything you need to do a quality job yourself
with GREEN FIBER cellulose insulation.
Follow these simple
instructions:
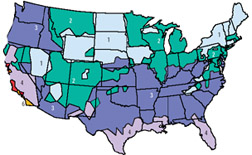
How much
insulation do I need, and how do I install it?
Match the color of your
location on the map with the heat type on the chart to
determine the R-Value needed for you attic. Locate the
coverage chart on the back of the GREEN FIBER Cellulose
insulation bag. Move directly to the right from the desired
R-value to the column headed "Maximum Sq. Ft. Coverage per
Bag" and make a note of the number you find there.
Multiply the length of
your attic by the width, then divide the result by the
number you found under the "Maximum Sq. Ft. Coverage per
Bag" column. The result is the number of bags of
GREEN FIBER
cellulose insulation you need to insulate your attic.
(Note: this is the minimum amount required to
compensate for settling. Be sure to install at least
this number of bags.)
Blowing your
attic.
You may need to place a
board across the ceiling joists in order to stand securely
in the attic. DO NOT walk on ceiling covering (drywall).
Too much weight will crack the ceiling. A dust mask,
adequate lighting and a hat are recommended.
Before you begin to
insulate, mark your vertical members to the depth you desire
to aid your installation. If duct work is present in the
attic, make sure it is adequately sealed with duct tape.
Set up the blowing
machine and make a stack of bags next to the machine as a
working table. Place a bag on top of the stack and open the
sealed end of bag and start breaking up the insulation as
you feed the material into the hopper. NEVER fill the
material over the round bars in the hopper. The best height
is just above the agitator tines. NEVER reach into
the hopper while the machine is plugged in. NEVER
place a whole bag of insulation into the hopper at one time.
Hold the hose at an upward
angle of 15% to obtain the best results.
Begin insulating at the
back of the attic area and work towards the entrance, Making
certain that you do not cover heat producing devices such as
recessed lighting, etc. A 3" gap is required around these
devices for safety. This barrier may be made of furnace
pipe or cardboard with an open top. Make sure no insulation
gets in this barrier.
Be sure you do not cover
soffit vents, as the attic must be properly ventilated to
dissipate excess heat and moisture during the summer.
Measure your
sidewalls.
Find the total length of
all the walls to be insulated.
Multiply the length by the
height of your walls. This will give you the side wall
square footage.
Divide the side wall
square footage by the coverage per bag as indicated by the
sidewall coverage chart. This is the number of bags of
GREEN FIBER cellulose insulation you need for your walls.
(NOTE:
windows and doors and not deducted in the above calculation. You
should deduct for these areas.)
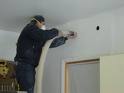
Blowing side
walls.
Side
walls require patience and planning. Caution must
be exercised. Too much pressure in the wall cavity can
cause the wall covering to push away.
Measure your
studs or located them with a stud finder. In some cases,
nail heads can be seen on interior or exterior walls,
revealing the pattern of the studs.
1-2"
HOLES - On wall, measure 12" down from the ceiling and
24" up from the floor. In each cavity, drill two (2)
1" holes neatly in line with one another for a neat finished
look. Add a third hole in the middle if your walls are 10'
or higher. Use the 2 to 1 reducing nozzle.
1-2" Hole On wall measure down 4" from the ceiling and
drill a 2" hole in each stud cavity. Use a 2" right angle
nozzle.
After you have
drilled your holes, start filling the cavity, filling the
bottom hole first and continue to fill until the insulation
stops flowing through the nozzle. Turn the machine off and
move to the next hole. You may fill all the bottom holes
first or do one cavity at a time, whichever works best for
you.


 CELLULOSE INSULATION
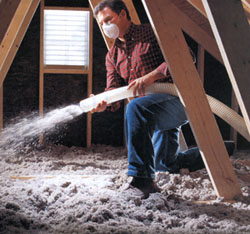
 HELPING HOMEOWNERS SAVE
MONEY AND INSULATING FOR OVER 50 YEARS
HELPING HOMEOWNERS SAVE
MONEY AND INSULATING FOR OVER 50 YEARS